오늘은 Lab에 위치할 두 가지 미션을 구현하기까지의 과정을 담아보았다.
Lab에서의 미션 위치는 키보드와 마우스에 있는 것으로 위치상 매우 가깝기 때문에,
Circle Collider을 지정할 때 좀 더 세심하게 지정해 주었다.
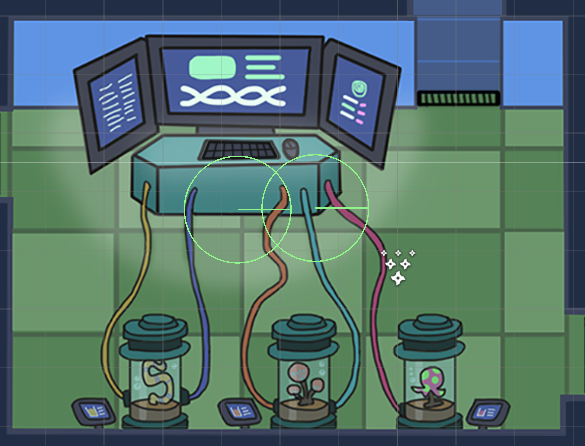
그 후 Lab의 각 Mission 아래에 Background를 깔아 미션 UI를 만들어 줄 것이다.
지정된 숫자 코드 입력하기)
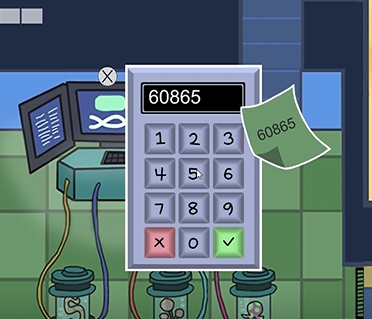
우선 Mission3은 위와 같이 랜덤으로 숫자가 생성되면,
아래의 키보드 자판을 클릭해 같은 숫자의 string을 순서대로 입력해주면 미션 Clear!! 되는 원리이다.
우선 위의 그림과 같이 계산기 모양의 자판 부분에 0부터 9까지의 숫자 투명 버튼을 생성해 준다.
Delete와 Check 버튼도 잊지말고 추가해준다.
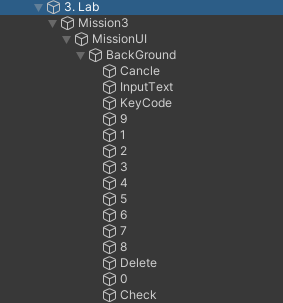
그리고 KeyCode가 들어갈 Text도 생성해 주고, 저번 미션 처럼 Cancle Button 까지 추가하면 된다.
이때 Hierachy는 Mission 3에 Background 아래에 넣기!
그럼 아래와 같이 구성된다.
그리고 script를 통해
- KeyCode에 6자리 String을 랜덤 생성하는 기능
- 버튼 기능이 InputText에 들어가 출력되게하는 기능
- KeyCode==InputText 를 확인하는 기능
이렇게 세 가지를 구현하고 각 버튼에 연결하면 된다.
Mission 3 script)
|
1
2
3
4
5
6
7
8
9
10
11
12
13
14
15
16
17
18
19
20
21
22
23
24
25
26
27
28
29
30
31
32
33
34
35
36
37
38
39
40
41
42
43
44
45
46
47
48
49
50
51
52
53
54
55
56
57
58
59
60
61
62
63
64
65
66
67
68
69
70
71
72
73
74
75
76
77
78
79
80
81
82
83
|
using System.Collections;
using System.Collections.Generic;
using UnityEngine;
using UnityEngine.UI;
using UnityEngine.EventSystems;
public class Mission3 : MonoBehaviour
{
public Text inputText,keyCode;
Animator anim;
PlayerCtrl playerCtrl_script;
MissionCtrl missionCtrl_script;
void Start()
{
anim = GetComponentInChildren<Animator>();
}
//미션 시작
public void MissionStart()
{
anim.SetBool("isUp", true);
playerCtrl_script = FindObjectOfType<PlayerCtrl>();
missionCtrl_script = FindObjectOfType<MissionCtrl>();
//초기화
inputText.text = "";
keyCode.text = "";
// 키코드 랜덤
for(int i = 0; i < 5; i++)
{
keyCode.text += Random.Range(0, 10);
}
}
//엑스 버튼 누르면 호출
public void ClickCancle()
{
anim.SetBool("isUp", false);
playerCtrl_script.MissionEnd();
}
// 숫자 버튼 누르면 호출
public void ClickNumber()
{
if(inputText.text.Length <= 4)
{
inputText.text += EventSystem.current.currentSelectedGameObject.name;
}
}
//삭제버튼 누르면 호출
public void ClickDelete()
{
if(inputText.text != "")
{
inputText.text = inputText.text.Substring(0, inputText.text.Length - 1);
}
}
// 체크 버튼 누르면 호출
public void ClickCheck()
{
if(inputText.text == keyCode.text)
{
MissionSuccess();
}
}
//미션 성공하면 호출
public void MissionSuccess()
{
ClickCancle();
missionCtrl_script.MissionSuccess(GetComponent<CircleCollider2D>());
}
}
|
cs |
순서대로 숫자 입력하기)
자, 이제 키보드와 비슷한 형식으로 구현하면 되는 Mission 4도 구현해보도록 하자!
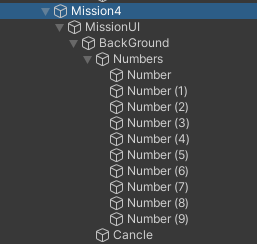
이번 미션은 아래와 같이 숫자가 순서가 랜덤으로 생성이될 때, 1부터 10까지 순서대로 눌러주면 미션 성공이다.
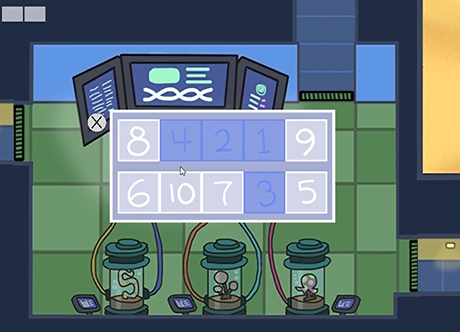
이때도 버튼으로 1부터 10까지 생성해서 Background 안에 넣어주면 된다.
우선 아래의 사진과 마찬가지로 Hierachy를 구성하면 된다.
Mission4 Script)
|
1
2
3
4
5
6
7
8
9
10
11
12
13
14
15
16
17
18
19
20
21
22
23
24
25
26
27
28
29
30
31
32
33
34
35
36
37
38
39
40
41
42
43
44
45
46
47
48
49
50
51
52
53
54
55
56
57
58
59
60
61
62
63
64
65
66
67
68
69
70
71
72
73
74
75
76
77
78
79
80
81
82
83
84
85
86
87
88
|
using System.Collections;
using System.Collections.Generic;
using UnityEngine;
using UnityEngine.UI;
using UnityEngine.EventSystems;
public class Mission4 : MonoBehaviour
{
public Transform numbers;
public Color blue;
MissionCtrl missionCtrl_script;
Animator anim;
PlayerCtrl playerCtrl_script;
int count;
void Start()
{
anim = GetComponentInChildren<Animator>();
missionCtrl_script = FindObjectOfType<MissionCtrl>();
}
//미션 시작
public void MissionStart()
{
anim.SetBool("isUp", true);
playerCtrl_script = FindObjectOfType<PlayerCtrl>();
// 초기화
for(int i = 0; i < numbers.childCount; i++)
{
numbers.GetChild(i).GetComponent<Image>().color = Color.white;
numbers.GetChild(i).GetComponent<Button>().enabled = true;
}
// 숫자 랜덤 배치
for (int i = 0; i < 10; i++)
{
Sprite temp = numbers.GetChild(i).GetComponent<Image>().sprite;
int rand = Random.Range(0, 10);
numbers.GetChild(i).GetComponent<Image>().sprite = numbers.GetChild(rand).GetComponent<Image>().sprite;
numbers.GetChild(rand).GetComponent<Image>().sprite = temp;
}
count = 1;
}
//엑스 버튼 누르면 호출
public void ClickCancle()
{
anim.SetBool("isUp", false);
playerCtrl_script.MissionEnd();
}
// 숫자 버튼 누르면 호출
public void ClickNumber()
{
if(count.ToString() == EventSystem.current.currentSelectedGameObject.GetComponent<Image>().sprite.name)
{
//색 변경
EventSystem.current.currentSelectedGameObject.GetComponent<Image>().color = blue;
//버튼 비활성화
EventSystem.current.currentSelectedGameObject.GetComponent<Button>().enabled = false;
count++;
// 성공여부 체크
if(count == 11)
{
Invoke("MissionSuccess", 0.2f);
}
}
}
//미션 성공하면 호출
public void MissionSuccess()
{
ClickCancle();
missionCtrl_script.MissionSuccess(GetComponent<CircleCollider2D>());
}
}
|
cs |
이렇게 코드를 작성해서 각 버튼에 연결해주면 미션 4까지 잘 구현할 수 있다!!
'유니티 > AmongUs 클론코딩 (30일 프로젝트)' 카테고리의 다른 글
| [Unity] #7. 게임 플레이 컨텐츠 만들기 : 미션 in Electric (0) | 2022.03.04 |
|---|---|
| [Unity] #6. 게임 플레이 컨텐츠 만들기 : 미션 in Prop_Down/Up (0) | 2022.03.02 |
| [Unity] #4. 게임 플레이 컨텐츠 만들기 : 미션 in Cafeteria (0) | 2022.03.01 |
| [Unity] #3. 게임 플레이 컨텐츠 만들기 : 미니게임 미션 기본 세팅 (0) | 2022.03.01 |
| [Unity] #2 게임 플레이 환경 만들기 : 메뉴, 캐릭터, 맵, 설정 (1) | 2022.01.16 |


